


Deploy Cloud Drive Mapper (CDM) in a virtual desktop infrastructure environment
VDI deployments eliminate the need for individual desktop management, especially when upgrading users across your organization to the latest version of the application or troubleshooting issues to diagnose and fix them centrally. CDM can also be deployed in a VDI environment. Here is a summary of the steps involved in this process:
Install CDM
You’ll start by installing CDM on the server that your users will connect to. We recommend using the CloudDriveMapper.exe file for VDI and server deployments, as we’ve built an additional VDI-specific control in the EXE installer that can be helpful. Depending on your environment, you can deploy CDM using its EXE installer to both x64 and ARM64 devices. You can download the EXE file for either of the two device types from the Downloads page in Iris. For more information about installing CDM, see the Prerequisites and compatibility and Install CDM on a standalone computer sections.
Remove Startup shortcut
While installing CDM using the EXE installer, if you selected the Run CDM on startup checkbox, Windows would’ve added CDM to the Start-up folder for automatic launch at startup. ![]()
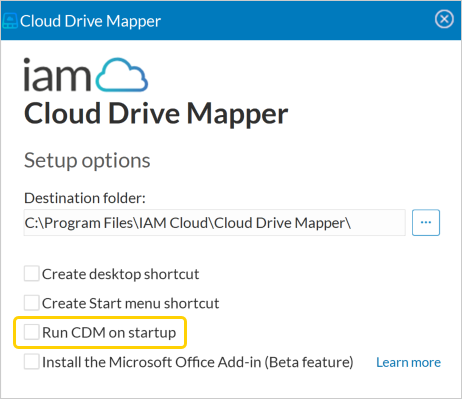
The issue is that Windows delays launching apps in the Start-up folder until after loading the user profile and other startup processes, which affects CDM’s performance. To avoid this, you must delete the CDM shortcut from the Start-up folder.
You can ignore this step if you didn’t select the Run CDM on startup checkbox while installing CDM.
Follow these steps to remove the CDM shortcut from the Start-up folder:
-
Press Windows + R on your keyboard to open the Run dialog box.
-
Enter shell:common startup in the Open: box, then select OK to open the Start-up folder.
-
Delete the Cloud Drive Mapper shortcut from the Start-up folder.
In published app environments, where users don't interact with CDM directly, Single Sign-On (SSO) must be enabled so CDM can auto-authenticate the user and map any required drives during the "published app session".
Create a batch file
After deleting the CDM shortcut from the Start-up folder, you'll need to create a batch file that includes the startup command for CDM. Your chosen startup method will use this file to launch CDM at login. A batch file is a script that stores commands that are executed in a sequential order.
Configure a startup method
You can configure a startup method for CDM by applying one of the following:
-
Manipulate the Userinit registry key (the most successful and widely used method)
Logging off from a published app environment
Occasionally, CDM can continue running on the server even after Graceful Logoff from a published application environment. To prevent this from happening, you will need to add the name of the CDM executable file to the following registry key:
HKEY_LOCAL_MACHINE\SYSTEM\CurrentControlSet\Control\Citrix\wfshell\TWI
Value Name: LogoffCheckSysModules
Type: REG_SZ
String: CDM.Core.exe,Cloud Drive Mapper.exe
The LogoffCheckSysModules registry key relates to the Citrix Workspace software platform. It allows you to specify which background processes should be checked during logging off any of your published applications.
